http://www.e-solat.gov.my/


 Another beautifully simple knotthat can be tied in the dark, The Jansik Special is a high strength knot tied as follows:
  The Palomar Knot is another very simple knot for terminal tackle. It is regarded by the International Game Fish Association consistently as the strongest knot known. It's great virtue is that it can safely be tied at night with a minimum of practice.
  There are at least 6 variations of the Hangman's Knot, - all of them excellent for terminal tackle, swivels and hooks. The "standard" Hangman's Knot holds only five turns when tied in monofilament nylon. If tied in rope, and used for its stated purpose, it takes eight turns.
  This is a much simpler variant. In all likelihood, this Grant's Uni-Knot. I have used it for more than fifty years and it has never failed me, whether tied in 1kg or 50kg monofilament. It was taught to me by the late Wally Kerr, a top flathead fisherman.
  Restricted to lines of breaking strength less than about 20kg, the process is a simple one.
  Where there diameters are very dissimilar, either the Surgeon's Knot should be used, or the thinner line should be doubled where the knot is formed.
 Earlier mention was made that if the two lines to be joined vary greatly in their diameters, the lesser line may be doubled at the knot, or the Surgeon's Knot may be used. In the latter case, it will probably be necessary to have one of the lines rolled on a spool, or perhaps wrapped on a temporary card, so that it may be passed through the loop.
  The double may be tied by means of the simple Spider Hitch with lines to 15kg. The big game boys use the Bimini Twist, a double that is normally formed by two people who make the intitial twenty twists. The Bimini is obviously beyond the scope of this little book. It's smaller brother, the Spider Hitch, is a much faster and easier knot for the light tackle fisherman.
  This is a special knot used for attaching a swivel to a double line.
 Another end loop can be tied quickly and easily using the Blood Bight Knot.

 The float fisherman uses a running float for casting and general handiness, and stops the float from running up the line by using the Float Stop. It has the advantage that the stops moves readily over the rod guides, but grips the monofilament nylon so tightly that it will not slide over the line.
 Tied in monofilament nylon, the Turle Knot may slip unless another Simple Overhand Knot is made at the end of the line where it leaves the Turle Knot.
 Miscellaneous Rigs


Balloon Rig

Popping Bobber Rig

Saltwater Sliding Bottom Finder (modify for freshwater as below)
 (for freshwater use disk weight/bank weight according to depth and current-usually 1oz to 3 oz, and use a leader equal to main line)
GOLD HOOK RIG

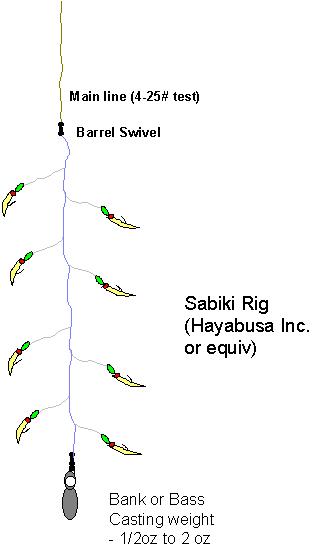
SQUID CATCHER RIG (uses 4 drop loops)
 Main Line: 4# to 8# mono Hooks: #4 treble hooks with white or glowing string tied around each shank, tie off and leave ends hanging behind hooks Weight: either 1oz to 4oz bank sinker, or tie a squid jig in lieu of the weight
Jig under lights at night just under the surface or during the day deep through a squid school.
Octopus rig- No Bait Option

Simple Lure (trolling feather, etc.) Single Hook trolling rig with beads (Picture)
 Notes: Most commonly used rig for tunas (can use a double hook too, though I usually don't, this is how I rig for trolling for albies out west and mahis out east), cudas, ceros/sierras/spanish mackerel, and mahi, esp. in Keys or open Pacfic. Works with 60lb+ flourocarbon or single strand wire. Put a ball-berring swivel at the top (mostly use 2 rod lengths of leader +/- hook to swivel, tie main or bimini to swivel) Back to Top
Octopus rig with bait (use mono leader for Stripers/ Dolphin/Sailfish)


Egg Weight Rig for use with Dough Baits
 Main Line: 2# to 4#- Smaller trout/ Bullhead Catfish/ Minnow/Small Carp; 8#-15#: Steelhead/Larger Catfish (channel catfish)/Large Carp; 20#+: Very Large Catfish (dough/worms/liver)/Sturgeon/Large Steelhead Leader: either pre-tied snelled hook (single or treble) or mono: 2#-4# for Trout or very clear water, otherwise the same strength as main line. Hook:
| FISH | Trout/Small Carp/Minnows | Midsize fish | Large fish |
| Treble | #14-#10 | #8-#4 | #4-#1/0 |
| Single hook | #12-#8 | #6-#2 | #2+ (only if very firm dough bait) |
Natural bait (or Salmon Egg) Rig with Slip Lead for Freshwater
 Main Line: 2# to 4#- Smaller trout/ Bullhead Catfish/ Minnow/Small Carp; 8#-15#: Steelhead/Larger Catfish (channel catfish)/Large Carp; 20#+: Very Large Catfish (dough/worms/liver)/Sturgeon/Large Steelhead Weight: Smallest possible-from 1/4oz to 3 oz depending upon current. Leader: either pre-tied snelled hook or mono: 2#-4# for Trout or very clear water, otherwise the same strength as main line. Hook:
| FISH | Trout/Small Carp/Minnows/Panfish | Midsize fish (inc. Basses) | Large fish (inc. Basses |
| Single hook | #12-#8 | #6-#2 | #2+ |
Split Shot rigging with Bait

Note: Use small split shot up to 1/4 oz and pinch lightly 12" above the hook. Use a small enough hook that the intended bait completely covers the hook (a bait hook or salmon egg hook is recommended).
 RIGGING TABLE
| SPECIES/Bait Size | King Mackeral/Wahoo/other Saltwater toothy Pelagics | Large Stripers/Mahi-Mahi | Salmon |
| LEADER | #4-#6 single strand wire -36" to 48" (smaller fish-24"/#4) | 40# to 80# mono - 48" | #3-#4 wire, single strand wire -36" |
| First Hook | 1/0 single or 1/0 treble | 1/0 single | 3/0 single barbless |
| Lead to Stinger& Bait Size | Large Baits (14"+) use 6" of #6-#8 wire and consider a second stringer near tail of bait. Use 1/0 to 2/0 treble. Smaller baits use a single stinger 1" forward of the tail, #2 treble. | (IF stinger is allowed, (note: Might not be IGFA Compliant)) rig 60#-80# mono so that hook is 3/4 of way to the tail of the bait, use a 3/0 short shank single hook. Use a loop knot or crimp to allow bait to swimh freely to attach stinger. | (if allowed) #4 wire to a 3/0 barbless, 4" between first hook and stinger |
| Notes |
Diamond Jig Rigs and Employment

Nymphing Rig with Weighted Bobber
 Notes: First try on the nymph, then pinch on the split shot (1/16 oz) 12" above the nymph, then clip the bobber so that the distance from the bobber to the splitshot is equal to the water depth. Use the smallest bobber possible (.5" to 1.5" diameter).
Casting bubble with Fly
 Notes: Run the main line through the Bubble and to a barrel swivel that is just arge enough not to slip though the bubble. Tie 24" or longer length of leader to the barrel swivel and tie the other end to the fly. This rig will work with any light lure (or soda straw and treble hook) and is used not only with light leaders (1# to 4# mono) for rainbow trout in freshwater, but with heavy leaders and larger lures for mackerels (40# mono ) in saltwater.
Crankbait with Leader

Jig Drop Loop Rig

Tube Mackerel Rig

Uncle Big John's Crappie Trolling Rig
Jig and Bug Rig

Nighttime Pacifc Mackerel Pier Rig
Use under the lights or in the dark for mackerel, jacks, and similar smaller schooling fish..soft plastics or squid/worm/shrimp strips work, may need a slight wiggle of rodtip to get them to bite.

Russian Carp Doughball Rig
(note: Not IGFA Compliant, check regs for your area) uses 1-3 treble hooks (#4) or single circle hooks(more ecologically sensitve) (#1) Employ by baiting each hook with a doughball or corn kernels, then pitch into your favorite carp holding hole.

Inverted school rig for surface fish
Zip accross the surface for any surface hitting fish (or baitfish). Trailer hooks (as one would use on a plug or spoon) work just as well as jigs.

Casting jig and bobber rig for asian carp
slow retrieve with pulses.

tube jig body and bead rig with heavier hook for large deep asian carp
cast, let sink to bottom, then jig back.

Source
Tide 4 Fishing
Tide Forecasts
Fishing Map

NZ and Australia Weather & Tides Forecasts
Gamefish weight calculator
Fishing magazines and television
Looking for your fishing fix? We have a great variety of excellent publications and TV shows in New Zealand and here’s an overview of the options. Check for program details and times for television shows as times may vary.
 Monthlyand our longest running fishing publication. Great, informative reading from editor Grant Dixon and a very established team. See our news section for an overview of the latest issue.
Bi-monthly in A4 format - and one for the coffee table. Stunning photography complements some excellent articles which range from how to target gamefish to catching snapper for dinner. Subs here. See our news section for an overview of the latest issue.
Tradezone Gone Fishin' Graeme Sinclair hosts our original TV show. Graeme travels extensively around New Zealand and always gives an entertaining half hour dose of things piscatorial. Check out Gone Fishin' TV3 - Saturdays.
Outdoors with Geoff
Geoff Thomas fishes and hunts and has been a popular fishing personality for a number of years. Catch Geoff on TV 3 - Saturdays.
Big Angry Fish
 PlaceMakers 'Big Angry Fish' is a TV show all about tips and techniques to catch trophy fish right at your back door step. Your host Milan and Nathan.
Matt Watson fronts with some lively action from above and below the water. - TV3 on Saturdays.
- Tide Charts (US)
- Lakes (US)
- Rivers & Streams (US)
- Trout Fishing Guide (US)
Maritime
| Jabatan
Laut Malaysia - Marine Department Malaysia http://www.marine.gov.my/
Peti Surat 12, Jalan Limbungan, 42007 Pelabuhan Klang, Selangor Tel: 03 3346 7777, Fax: 03 3168 5289 Jabatan Laut Sabah - Marine Department Sabah 2 Kompleks Jabatan Laut, Teluk Salut, Jalan Sepanggar, 88000 Kota Kinabalu, Sabah Tel: 088 40 1111 Jabatan Laut Sarawak - Marine Department Sarawak http://www.jls.gov.my/ Lot 683, Seksyen 66, Jalan Utama, Tanah Puteh, 93619 Kuching, Sarawak Tel: 082 48 4159, Fax: 082 33 1778 Malaysian Shipowners’ Association - MASA http://www.malaysianshipowners.org/ 17th Floor, Menara Dayabumi, Jalan Sultan Hishamudin, PO Box 10371, 50712 Kuala Lumpur Tel: 03 2275 2136, Fax: 03 2260 2575 |
Fishing Magazines
A River Never Sleeps
Fly fishing stories and photography from around the world. All about salmon, steelhead and trout fshing.
Bass Angler
Bass fishing magazine offering articles, angler profiles and bass fishing destinations for anglers world wide.
Bass Angler's Guide
Magazine with articles, tips, techniques, and tournament information for the avid Western bass angler.
CapMel.com
Florida Fishing OnLine Magazine with articles on how-to tips, boating, weather, regulations, conservation, and more.
Field and Stream
Popular magazine featuring in-depth articles on hunting and fishing as well as outdoor news, gear reviews, photo galleries, tips and advice.
Fine Fishing
Online magazine offering hundreds of fly-fishing, freshwater, and saltwater fishing articles.
Fish Alaska Magazine
Offers a variety of how-to fish articles, regional features, trip-planning advice, gear reviews, recipes, entertaining stories, and useful state information.
Fish Sniffer
Fishing newspaper in the West providing fishing reports, weather conditions, what and where to fish, recipes, techniques and maps.
Fishing and Outdoors
New Zealand's most widely read free fishing and hunting magazine.
Fishupdate.com
E-zine featuring the latest fish news, articles and links.
Florida Sport Fishing
Source for the best in Florida saltwater fishing. Find fishing reports and forum, tips and tales, product reviews, and weather reports.
Fly Anglers Online
Fly fishing weekly online magazine. Includes chat room, articles and resources.
Fly Fish America
Magazine providing gear reviews, fishing reports, fly patterns, and more.
Fly Fishing and Fly Tying
UK magazine contains articles, tips, and patterns from respected fly fishing writers and fly dressers.
Flyfishing Connection
Information about fly fishing rivers and streams throughout the US. Features fly fishing lodges, guides, hatch charts, more.
Game and Fish Magazine
Provides local, state-by-state fishing and hunting information for outdoor sporting enthusiasts.
In-Fisherman
Freshwater fishing magazine featuring instructional features from top fishermen, thorough product and equipment reviews and full color photography.
Inside Line
Bass fishing magazine filled with pro bass fishing tips, secrets, and bass fishing news.
Marlin Magazine
Resource for fishing boat and fishing equipment reviews, news, techniques, fishing vacation info, and videos.
MidCurrent
Provides fly fishing advice, trip information, gear and media reviews, excerpts of the best fly fishing literature.
Nor'east
Magazine about saltwater fishing. Features offshore fishing news and conditions, salt water fishing boats and equipment.
Online Fishermen
Online monthly magazine publishing freshwater and saltwater fishing news for fishermen, both experienced and the new comer.
Reel Time
Online saltwater fly fishing magazine. Includes feature articles, fishing reports, forums and photo gallery.
Sport Fishing
Magazine for saltwater fishing, including rigging, travel, conservation, boats, and products.
Resources
Manufacturers of Boats and Kayaks:
Freshwater Fishing
Organizations - National Federation of Sea Anglers - The Rhode Island Saltwater Anglers Assoc... - Marthas Vineyard Surfcasters Association... - Quality Time Fishing Club - Orange Beach Fishing Association - Irish Federation Of Sea Anglers - High Hill Striper Club - Florida Lure Anglers - Bluewater Sportfishing Club - Bradford & District Sea Angling Club... - Recreational Fishing Alliance. - Rodrigues Big Game Fishing Club - Coastal Flyrodders - Jersey Coast Shark Anglers - Gower Rockhoppers Sea Angling Club - Lowcountry Anglers Fishing Club - North Louth Sea Anglers - Peninsula Salt Water Sport Fishermans As... - Southern Kingfish Association - SWWASAC - The National Mullet Club - High Desert Saltwater Anglers - Down Riggers Fishing Club - Coastside Fishing Club - Dartmouth Angling and Boating Associatio... - Desford Sea Angling Society - Eastbourne Nomads Angling Club - Shoalhaven Game Fishing Club - The Victorian Game Fishing Club - Sports Fishing Club of the British Isles... - Muscat Game Fishing Association - Kona Charter Skippers Assn. - Kingfisher Angling Club of Southern Cali... - Game Fishing Club of Northern Tasmania - Atlanta Saltwater Sportsmans Club - Bay of Islands Swordfish Club Inc - Bermuda Anglers Club - Bristol Channel Federation of Sea Angler... - Ancient City Game Fish Association - Whangaroa Big Gamefish Club - Machine Shop Beach Fishing Club - Brunel Sea Angling Club - Freeport Tuna Club - East Coast Dinghy Group - Blue Circle Sea Angling Club - Coalition of Confused Coastal Fishermen... - Nags Head Surf Fishing Club - Naples Fishing Club, Naples, FL - South King County Chapter of the Puget S... - Asbury Park Fishing Club - San Fernando Valley Saltwater Fishing Cl... - Port Vila Game Fishing Club - Poole Bay Small Boat Angling Club - Carling Wales Sea Angling Club
Tournaments - Bisbees Black and Blue Marlin Jackpot To... - International Gamefishing Tournaments - Bermuda Big Game Classic. - Maui Jim Hawaii Marlin Tournament Series... - Trash Fish Classic - White Marlin Open Fishing Tournament. - Hawaiian International Billfish Tourname... - ROLEX / IGFA Offshore Championship - The Big Rock Sailfish Challenge - Sturdivant Island Tuna Tournament - World Championship Billfish Release Tour... - Tobago Game Fishing Tournament - World Billfish Series - Los Cabos Billfish Tournament - Cow Town Tuna Jackpot - Florida Fish for Life - Fort Lauderdale Billfish Tournament - Gold Cup Invitational Tarpon Fly Tournam... - Key West Fishing Tournament - Ladies Invitational Bluefish Tournament... - Bahamas Rotary Tuna Classic - Worlds Richest Tarpon Tournament - World Cup Blue Marlin Championship - Cape Fear Blue Marlin Tournament - USVI Caribbean Atlantic Blue Marlin Tour... - Orange Beach Red Snapper World Champions...
Big Game - Blue Marlin Big Game Fishing - Senor Tuna - Halibut.Net - Rezkill Fishing Adventures - Extreme Fish - Billfish International - Titelines - South Fishing Inc - Shark Fishing - Tuna Fishing Basics Catfish - Catfishing Recipes Baits and Secrets - Catfishing Rivers and Creeks - Catfishing from the Dock - Fishing Oklahoma: Catfish - Catfish University - Catfish Fishing Tips and Information - Catfish Joes Web Site - Catfishing.tv - A Bit O Sense Catfishing - Catfishing Puerto Rico - Jackfishs Catfish Pages - Catfish Billys Big Cat Diaries - Master Catters - United States Catfish Angler Tournament ... - Kansas Catmasters Bait & Tackle - Silurus Glanis - Wels Catfish (Catfish a... - Katmasters.com - The Catfish Society - Trophy Catfishing - Catfish Tips and Tricks - Professional Catfishing Association - Ohio River Catfishing - KatManDEW - Flood Creek - WhiskerKitty.com - Catfishing On The James - American Catfish Tour - Brotherhood of Catfishermen - Cat Fishing America - Cabelas King Kat Tournament Trail - Cat Tracker - Team Whiskers - Kansas Angler Online - Southern Catfishermen Association - Sayata Fishing Well - SanBarheros Catfishing - Lazy Daves - Katchaser Trophy Catfishing - Harold Dodds Brown Water Catfishing - Delaware River Catfishermen Association... - CatfishED.com - Cincinnati Catfishing - Catfishing West Virginia - Team Mossy Back - Catfish Heaven - Mega Cat Crew - Welscatfish.co.uk - Channel Catfish Identification, Facts an...
Carp - The St Lawrence Experience - Carp Fishing - My Carp Gallery - Carp.com - Canadian Carpin Holidays - Canadian Carp Club - BigCarp Net - Best-Carp - Carp fishing in Portugal - CarpPhoto - Supafish.com - The Mad Carper - Fish4Carp.co.uk - Quest For Carp - Northern Ireland Carp Anglers Society - How to make cheap boilies - Carpfishing UK - Carpcatcher - Carp Passion - Carp Hunters - European Carp Waters - Carp Fishing UK - Carp Association - Carp Anglers Group USA - Bownys Carp Fishing - Belgium Carp Magazine - The Carp Society UK - Fisheries in the United Kingdom - That aint no Bream - British Carp Fishin... - Environment Agency United Kingdom - CarpEast
Walleye - Walleye Dot Info - Walleye Fishing in Northwest Ontario - Ontario Walleye Fishing - How to Tie Crawler Harnesses - Walleye Central - Walleye First - Walleye Warrior - Walleyehunter.com - Walleyes Unlimited of Montana - Go Walleye - EmoWalleye.com - Walleyes Inc - Walleye Fishing Web - Canadian Walleye Championship - Nebraska Walleye Association - North Platte Chapter - Walleyes Unlimite... - SRWA Walleye Tournaments - Walleye News - Fish n Finn - Downriver Walleye Federation - Western Walleye Magazine Northern Pike and Musky - Ontario Muskie Fishing - Esox Hunter - Muskies Inc. - Jomusky.com
Northern Pike and Musky - C & R Musky Club - Musky Hunter - MUSKIE Ontario - Montana PikeMasters - Muskie Central - Muskie Fishing Club - The Pike Crew - Pike fishing on the Somerset Levels - MuskieFIRST - Musky Marauders - Muskellunge Fishing - Bruces Midwest Musky Fishing Site - Jims Pikeing - The Perchfishers - Bluegill Fishing - Anglers Times.co.uk. - Rough Fish - Fishingposts.com - Bluegill Fishing in Missouri - Fishing for Bluegill - White Sturgeon Fishing - National Fresh Water Fishing Hall of Fam... - Lake Sturgeon - Gar Fishing
Crappie - Crappie Fishing: About.com - Crappie.com - The Crappie Killer - American Crappie Association - Crappiemasters - Crappie Derby |
| Asian Yatching http://www.asianyachting.com/ Bintulu Port http://www.bpsb.com.my/ Lot 15, Block 20, Kemena Land District, 12th Mile, Tanjung Kidurong Road, PO Box 996, 97008 Bintulu, Sarawak Tel: 086 25 1001, Fax: 086 25 3597 Bintulu Port Authority http://www.bpa.com.my/ PO Box 296, 97007 Bintulu, Sarawak Tel: 086 25 3888, Fax: 086 25 2929 Boustead Shipping Agencies http://www.bousteadship.com.my/ Suite P1.01, Level 1 Menara Trend, Intan Millennium Square, 68, Jalan Batai Laut 4, Taman Intan, 41300 Klang Tel: 03 3005 8388, Fax: 03 3005 8616 Brooke Dockyard & Engineering Works Corporation http://www.brookedockyard.com/ Sejingkat Yard, Jalan Bako, Petra Jaya, 93050 Kuching, Sarawak Tel: 082 43 9732, Fax: 082 43 9736 China Shipping Malaysia Agency http://www.chinashpg.com/ 4-213 Jalan Susur, Persiaran Raja Muda Musa, 42000 Port Klang, Selangor Tel: 03 3166 4811, Fax: 03 3166 4822 DNV - Maritime risk mangement services, certification, consulting http://www.dnv.com.my/ 24th Floor, Menara Weld, Jalan Raja Chulan, 50200 Kuala Lumpur Tel: 03 2050 2888, Fax: 03 2032 4886 CMC Register of Apparatus Assignments - Maritime Mobile Stations - Name of Vesssels, Callsigns, MMSI Number http://www.cmc.gov.my/registers/ Glenn Cruise Terminal - see Port Klang Cruise Centre Global Maritime Ventures Berhad - Marine venture capital investment holding company http://www.gmvgroup.com/ Level 15, Bangunan Bank Industri, Bandar Wawasan, 1016 Jalan Sultan Ismail, 50790 Kuala Lumpur Tel: 03 2733 9962, Fax: 03 2694 0860 Gugusan Maritime GMSB - Shipbroking, chartering, sale & purchase, tugboat, ferry, pilot, salvage boats, chandling http://www.gugusan.com.my/ Suite 15-1, Level 15, Heritage House, 33 Jalan Yap Ah Shak, 50300 Kuala Lumpur Tel: 03 2697 5525, Fax: 03 2697 9525 Ipoh Cargo Terminal Jalan St John, 30200 Ipoh, Perak Tel: 05 527 2415, Fax: 05 527 3413 Institut Kelautan Malaysia - IKMAL http://www.ikmal.org.my/ 47A Lorong Cungah, 42000 Port Klang Tel: 03 3166 2472, Fax: 03 3166 2870 Jabatan Laut Malaysia - Marine Department Malaysia http://www.marine.gov.my/ Tel: 03 3346 7777 Johor Port http://www.johorport.com.my/ "K" Line Maritme Malaysia http://www.kline.com.my/ Level 15-02, Plaza Masalam, 2 Jalan Tengku Ampuan Zabedah E9/E, Section 9, 40100 Shah Alam, Selangor Tel: 03 5510 2400, Fax: 03 5510 2382 KL Marine - Leisure Boats Rental Service http://www.klmarine.com/ 6 Lorong Awan 1, 68000 Ampang. Tel: 013 206 3988 (Philip Loh) Kuantan Port Consortium http://www.kuantanport.com.my/ Wisma KPC, KM25 Tanjung Gelang, P.O Box 199, 25720 Kuantan, Pahang Tel: 09 583 3205, Fax: 09 583 9393 Langkawi Ferry Services - Service at Langkawi Island, Kuala Kedah, Kuala Perlis, Penang, Satun & Medan http://www.langkawi-ferry.com/ 37 & 39 Jalan Pandak Mayah 5, 07000 Langkawi, Kedah Tel: 04 966 9439, Fax: 04 966 7190 Lembaga Pelabuhan Johor - Johor Port Authority http://www.lpj.gov.my/ 6A1-8A1, Pusat Perdagangan Pasir Gudang, Jalan Bandar, 81700 Pasir Gudang, Johor Tel: 07 253 4000, Fax: 07 251 7684 Lembaga Pelabuhan - Kemaman Port Authority Telok Kalong, PO Box 66 24000 Kemaman, Terengganu Tel: 09 863 1590, Fax: 09 863 1599 Lembaga Pelabuhan Klang - Port Klang Authority http://www.pka.gov.my/ Mail Service 202, Jalan Pelabuhan, 42005 Port Klang, Selangor Tel: 03 3168 8211, Fax: 03 3167 0211 Lembaga Pelabuhan Kuantan - Kuantan Port Authority http://www.lpktn.gov.my/ Tanjung Gelang, Peti Surat 161, 25720 Kuantan, Pahang Tel: 09 585 8000, Fax: 09 583 3866 Lumut Port http://www.lumutport.com/ Lumut Maritime Terminal Lot 1, Lumut Port Industrial Park, Jalan Kampong Acheh, Mukim Lumut, 32000 Sitiawan, Perak Tel: 05 692 8111, Fax: 05 692 8119 Malacca Port SPPG Sdn Bhd Pelabuhan Tanjung Bruas, Tanjung Kling, 76400 Melaka Tel: 06 351 1216, 06 351 1804 (Wharf ), Fax: 06 351 1216 Malaysian Bulk Carriers - MBC http://www.maybulk.com.my/ Level 17 & 18, PJ Tower, 18 Jalan Persiaran Barat, Off Jalan Timur, 46050 Petaling Jaya, Selangor Tel: 03 7966 1688, Fax: 03 7966 1628 Malaysia Marine and Heavy Engineering (formerly Malaysia Shipyard and Engineering MSE) http://www.mmhe.com.my/ PLO 3, Jalan Pekeliling, P.O. Box 77, 81700 Pasir Gudang, Johor Tel: 07 251 2111, Fax: 07 251 9248 Malaysia Maritime Academy - Akademi Laut Malaysia ALAM http://www.alam.edu.my/ Window Delivery 2051, Masjid Tanah Post Office, 78300 Melaka Tel: 06 387 6201, Fax: 06 387 6700 Malaysian Customs Information Portal - eCustoms - Tariff code, import/export custom duty, tax, ASEAN CEPT http://www.ecustomsnet.com/ Maritime Institute of Malaysia MIMA - Institut Maritim Malaysia http://www.mima.gov.my/ B-06-08 Megan Avenue II, 12 Yap Kwan Seng, 50450 Kuala Lumpur Tel: 03 2161 2960, Fax: 03 2161 4035 Meridian Surveys - Vessel tracking, vessel management & fleet management systems http://www.meridiansurveys.com.my/ E-3-2, Jalan Selaman 1/2, Dataran Palma, Off Jalan Ampang, 68000 Ampang Tel: 03 4270 5505, Fax: 03 4270 5545 MISC - Malaysia International Shipping Corporation http://www.misc.com.my/ Level 25, Menara Dayabumi, Jalan Sultan Hishamuddin, 50050 Kuala Lumpur Tel: 03 2273 8088, Fax: 03 2273 6602 myCustoms - Malaysian Online Customs Portal - Classifications info, tariffs, procedure& guideline kastam http://www.mycustoms.org.my/ Nilai Inland Port http://www.nip.com.my/ PT 3907, Nilai Industrial Estate, PO Box 13, 71800 Nilai, Negeri Sembilan Tel: 06 799 4587, Fax: 06 799 4597 Noble Mermaid - Deep sea fishing, fishmeal & seafood supplies http://www.noblemermaid.com.my/ Northport - North Port, Port Klang http://www.northport.com.my/ Tel: 1 800 888 103, 03 3169 8000, Fax: 03 3169 8080 Orient Overseas Container Line (Malaysia) Sdn Bhd http://www.oocl.com/ (global site) Klang Container Terminal, Ground Floor, Wisma A, Jalan Pelabuhan North Port, 42100 Port Kelang Tel: 03 3176 6859, Fax: 03 3176 7469 P & O Nedlloyd http://www.ponl.com/ (global site) 23rd Floor, Menara Boustead, 69 Jalan Raja Chulan, 50734 Kuala Lumpur Tel: 03 2148 4544, Fax: 03 2148 9731 Penang Port http://www.penangport.com.my/ 1 King Edward Place, Georgetown, 10300 Penang Tel: 04 210 2211, Fax: 04 263 4792 Penang Port Commission PPC http://www.penangport.gov.my/ 3A-6 Bangunan Sri Weld, Pangkalan Weld, 10300 Penang Tel: 04 263 3211 Petra Perdana Group - Exploration & marine services http://www.petra.com.my/ Batu 7 Jalan Ipoh, 68100 Kuala Lumpur Tel: 03 6257 1111 Port of Tanjung Pelepas http://www.ptp.com.my/ Blok A, Wisma PTP, Jalan Pelabuhan Tanjung Pelepas, TST 507, 81560 Gelang Patah, Johor Tel: 07 504 2222, Fax: 07 504 2288 Port Klang Cruise Centre - Glenn Cruise Terminal (formerly Star Cruise Terminal) http://www.glennports.com/ Pelabuhan Klang, West Port Tel: 03 3161 7000, Fax: 03 3101 1271 As featured in MyCen Maps Royal Selangor Yacht Club http://www.rsyc.com.my/ Jalan Limbongan, 42000 Port Klang, Selangor Tel: 03 3168 6964, Fax: 03 3168 8650 Sabah Ports Authority - SPA http://www.infosabah.com.my/spa/ SPA Head Office Building, Jalan Tun Fuad, Tanjung Lipat, Locked Bag 2005, 88617 Kota Kinabalu, Sabah Tel: 088 53 8400, Fax: 088 22 3036 Sabah Shipyard http://www.saship.com/ Km 9 Jalan Ranca-Ranca, 87031, Labuan Tel: 087 42 5577, Fax: 087 41 0136 Star Cruises - see Port Klang Cruise Centre Westport Malaysia http://www.westportmalaysia.com.my/ Head Office: Level 11, Wisma E & C, 2 Lorong Dungun Kiri, Damansara Heights, 50490 Kuala Lumpur Tel: 03 2095 0899, Fax: 2093 3005 Port Office: Kelang Multi Terminal Sdn Bhd, P.O. Box 266, Pulau Indah, 42009 Port Klang Tel: 03 3169 4000, Fax: 03 3169 4119 ZON Ferry Terminal Johor Bahru, The - Tanjung Belungkor & Sebana Cove, Johor - Batam & Bintan Islands, Indonesia http://www.sriwani.com.my/dfz/ The ZON Johor Bahru, 88 Jalan Ibrahim Sultan, Stulang Laut, 80300 Johor Bahru, Johor Tel: 07 221 8000, 07 221 9000 |
No comments:
Post a Comment